
THE
ARMSTRONG SIDDELEY
PRESELECTOR GEARBOX
The following notes on the
Armstrong Siddeley
preselector gearbox are issued as a general guide
only. For information on any particular point
please write quoting the chassis number.
Contents
PRESELECTOR GEARBOX
THE CONTROL OF THE PRESELECTOR GEARBOX
MAINTENANCE OF THE PRESELECTOR
GEARBOX
ADJUSTING THE TOGGLE ACTION -
PRESELECTOR GEARBOX
TO INCREASE THE TOGGLE ACTION-PRESELECTOR
GEARBOX
TO DECREASE THE TOGGLE ACTION-PRESELECTOR
GEARBOX
DISMANTLING THE PRESELECTOR GEARBOX
RE-ASSEMBLING THE PRESELECTOR GEARBOX
This is a compound epicyclic gearbox giving four forward and a
reverse gear, the top gear being a solid drive. All the gear
wheels are permanently in mesh. Each indirect gear is obtained by
applying a brake band of special form to one of the drums, each
of which is integral with one element of a simple epicyclic gear.
By moving the lever on the steering column, a gear may be
preselected for subsequent use and engaged when required by fully
depressing and releasing the engagement pedal irrespective of the
state of the gear when the selection is made.
When the engagement pedal is only partially depressed it acts
as an ordinary clutch pedal and frees the engine from the
transmission.
The control consists of an engagement pedal, which takes the
place of the usual clutch pedal, and a selector lever mounted in
a dial on the steering column. The dial is marked to indicate
top, third, second, first, neutral and reverse positions. The
lever selects the gear while the pedal accomplishes the actual
gear change. A point of importance is that one gear can be
preselected while the car is running in another, the selected
gear only being put into use when the engagement pedal is fully
operated. Generally when changing gear one should go from one
speed to the next, but in cases where a change down necessitates
jumping one or two gears, the engine must be speeded up or the
car allowed to slow down to ensure a smooth engagement.
A few points which require special attention are :-
- The oil must be kept up to the mark on the dipstick. This
is found at the rear of the gearbox. The oil capacity of
the box is four pints. The oil used in the gearbox must
be as recommended.
- The oil should be changed after the first 500 miles and
then after every 5,000 miles. Every 5,000 miles remove
the plate held by four set screws which is on the
underside of the gearbox adjacent to the drain plug.
Remove the gauze filter and after cleaning it, replace.
- The gearbox should be pumped up occasionally to maintain
the brake bands in correct adjustment.
This operation is carried out about twelve times in each
gear with the engine stopped, and consists of pressing
the engagement pedal down to the stop, and letting it fly
back on its own accord to ensure the automatic adjusters
are working correctly.
- The following controls should be lubricated occasionally
- The preselector rack under the dial on the steering
column.
- The operating cross shaft through the oil hole in the
offside of the gearbox.
- The engagement pedal bush.
- If the pick up in low gear from a standstill is harsh, or
the engagement pedal heavy, it may be due to :-
- Insufficient oil in the gearbox.
- The engagement pedal requiring pumping up.
- The toggle action set incorrectly, requires
decreasing.
Before making an adjustment stop the engine and make sure that
the gear requiring adjustment is not engaged.
The first and reverse gears are partially engaged when in
neutral therefore the latter must not be selected when adjusting
either of these gears.
After making an adjustment always engage the adjusted gear and
pump up the engagement pedal until the automatic adjuster nut of
this particular gear stops rotating.
Very little toggle action is necessary for reverse gear and
this point must be borne in mind when making adjustments.
This is necessary if any of the gears tend to slip. The
adjustment is made as follows:
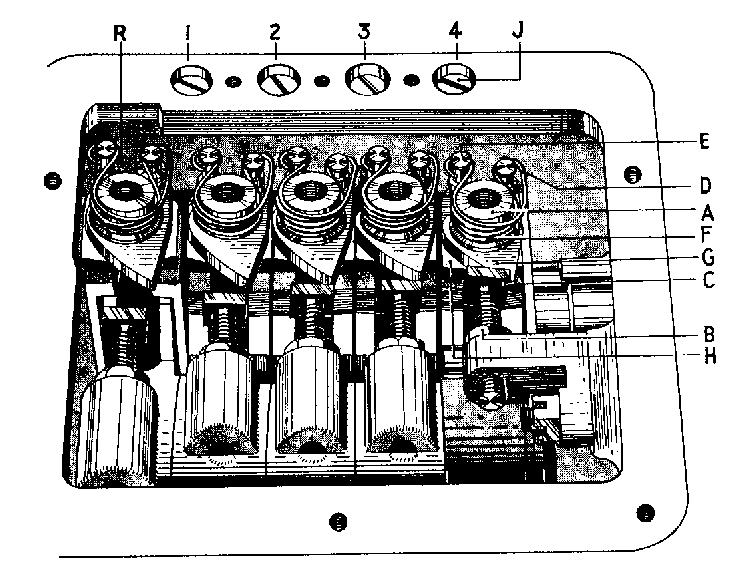
See Figure 2.
- Remove the gearbox cover.
- Make sure that the gear requiring adjustment is not
engaged.
- Slack off the lock nut B.
- Screw in the pyramid shaped set screw C a quarter of a
turn at a time and lock with the nut B.
- Lift the top eye E and the loop D of the spring F off the
pins. Do not remove the spring F from the nut A.
- Unscrew by half a turn the adjuster nut A to give the
toggle action more movement. A suitable bolt and locknut
can be used (3/8" B.S.F.).
- Replace the loop D and the eye E.
- Select the gear which has been adjusted.
- Pump up the engagement pedal until the adjuster nut A,
which should be marked with copying pencil, stops taking
up.
- Replace the cover and test the car on the road.
The movement of the automatic adjuster nut A, the spring
F, ring G, and table H are as follows :-
When the pedal is released after depression, the adjuster
nut A moves forward and the point of the ring G strikes
against the pyramid shaped set screw C which causes the
ring G to rotate slightly carrying with it the loop E of
the spring F. The table H to which is fixed the eye D of
the spring F does not rotate, neither does the nut A
which is locked by the tension on the brake band. This
movement causes the spring F to slacken its hold on the
nut A and to take up a different position.
When the pedal is again depressed the spring F exerts
itself and grips the nut A, the tail of the ring G
strikes the tail pin J which turns the ring G which by
means of the spring F screws the nut A down the rod
attached to the brake band in the case of all gears
except top, in which case the nut is screwed down the rod
operating the top gear cone, this movement automatically
compensating for wear.
See Figure 2.
When the engagement of the gears is inclined to be rough or
when the pedal becomes heavy, less toggle action is required, and
the following adjustment should be made.
- Remove the gearbox cover.
- Slack off the locknut B.
- Screw out the pyramid shaped set screw C one turn and
lock with nut B.
- Pump up the engagement pedal and note that the adjuster
nut A rotates, continue pumping until the nut stops
turning.
- Replace the gearbox cover and test the car on the road.
This alteration has the effect of reducing the movement
of the toggle action by bringing the pyramid shaped set
screw into action earlier and screwing the adjuster nut A
further down the pull rod.
The dismantling and re-assembly of the gearbox may be
undertaken by any competent mechanic and no difficulty should be
found provided the instructions are carefully followed. The bench
should be clean and free from other parts before the strip is
commenced. Take note of the position of the various parts and
washers so that they may be re-assembled correctly.
In the following instructions the name of each part is
followed by a letter and a figure and reference to Figure 1A, 1B, 1C, 1D or 1E should enable each part to be readily
identified. These illustrations are the same as those in the
Spare Parts List pages 72 to 87 where a complete list of gearbox
parts with full description and part number will be found.
- Remove the plug D79 to drain
the oil from the gearbox.
- Remove the top cover A38.
- Undo the three spring cap bolts E2
unscrewing them evenly.
- Remove the spring cap El and
the shims E4.
- Take out the bus bar spring E5
with the guides E6 and E7.
- Release and lift off the five automatic adjuster springs D62.
- Take off the side cover A55
complete with the camshaft A74,
etc.
- Unscrew the five automatic adjuster nuts D61.
- Remove the automatic adjuster rings D59 and tables D57 and
D78.
- Take out the thrust pad assemblies D51, D52 and D74.
- Remove the pull rod D63.
- Take off the seven nuts A10
and gently tap and remove the bell housing B1 complete with the input shaft
B17.
- Withdraw the outer member B5
complete with the actuating ring B7,
cone B35 and bearing B9 etc., taking care to guide
the operating strut B10 past
the casing.
- The remainder of the running gear can now he withdrawn
singly, i.e., brake drums, planet assemblies, etc.
Care must be taken to collect all the blushes and washers
which may have dropped out of place.
Note. If the reverse brake drum C34 is a tight fit in the rear
thrust bearing C36 it may be
necessary to remove the output shaft C37. This is done as follows :-
Take off the nuts A7 securing
the rear end cover A82 and
gently drive the output shaft C37
to the rear, complete with rear coupling flange C43, rear oil seal A83 and rear bearing C42, etc.
- In order to dismantle the brake bands D38 and D66,
the gearbox casing A3 must be
removed from the base plate D1
but before this is possible the top gear hooks D30 and D31
must be released from the side of the casing by taking
out the screw D64.
- Turn the casing and remove the screws from the base.
- Remove the oil well cover D5
and take out the spring D4
and the oil strainer D3.
- Reverse the casing and gently tap the lugs on the base
plate to break the joint.
- At the same time collect the 5/16" ball from the
pump valve D9 which is
located at the front end between the base and the casing.
- Press down the brake bands to disengage the hooks D26 to D29
when the brake bands can be lifted out complete after
removing the four link pins D24
of the internal bands. Take care not to lose the seven
guide springs D46.
- The locking piece plate A46
together with the locking pieces A43
and A44 can be taken from the
casing as a unit after removing the bolts A50.
- To strip the bell housing, input shaft and oil pump
assembly, take off the five ¼" nuts and remove the
front oil seal B32 turn back
the tabwasher B33 and remove
the ring nut B34 from the
input shaft B17. Prise off
the front cover B23 with a
screwdriver, at the same time tap the end of the input
shaft with a hide faced hammer to help break the joint,
thus removing the front outboard bearing B24 and bearing sleeve B20.
- The eccentric for the pump B18,
plunger B22 and pump cylinder
B21 can now be taken out.
- To separate the front bearing B30,
input shaft and key for eccentric B19
from the bell housing B1 and
locknut B25, which has an
external left-hand thread and is secured by
peaning the thread, must first be removed.
- To separate the top gear outer member assembly, the three
2BA nuts, which are secured to the ends of the bolts B39 by peaning, must be removed
when the anchor plate B38,
top gear thrust bearing B9,
thrust ring B6, actuating
ring B7, five balls B8, outer member B5, return spring B12 and compressor plate B11 will come apart.
- To dismantle the speedometer driving gear C38 the nut for the output shaft
C44, rear coupling flange C43 and rear end cover A82 with oil seal A83, rear bearing C42 and oil thrower, and the
distance piece C39 must all
he removed.
Care must be taken to see that all the parts are scrupulously
clean before re-assembly and that no grit or dust finds its way
into the easing.
The Running Gear
- If the bell housing, input shaft and oil pump unit has
been stripped it should be assembled first, taking care
that the oil hole in the eccentric B18 is opposite the oil hole in
the input shaft, and to Shellac the face of the oil pump
cover.
- When assembling the actuating ring B7 and other details in the
outer member B5 insert the
five balls B8 in the helical
tracks when lowering the ring and finally screw on the
three 2BA nuts with two threads showing which must be
peaned over to lock the nuts in place.
- Place the bell housing assembly face down and Shellac the
joint before fitting the actuating assembly in place.
Line up the holes so that the operating strut B10 is in the correct position.
- Fit in place the inner clutch cone assembly B35 to allow the driving member B36 with the bush B37 to engage with the splines
on the input shaft B17 and
drive gently home.
- With the input shaft still in the vertical position fit
the distance washer B28, a
bronze bush for third speed sunwheel C2 and the clutch thrust washer B16.
- Lay on the outer clutch cone Cl
and fit the other bush C2 and
the bush C4.
- Fit the second speed brake drum C3
in place and then the bush for the planet support C6.
- Fit the first and second speed sun wheel C16 on the splines of the input
shaft and then the bronze washer C24
and the two bushes C22 and C23.
- Fit the third speed annulus bush C13.
- Fit the bush C15 to the
planet carrier C14 and place
the carrier in position on the sun wheel.
- Also fit the planet carrier C18
on the sun wheel.
- Fit the bush C21 to the
forward face of the first speed brake drum C20, place it in position on the
planet carrier C18.
- Place the washer C25 in
position and lay on the reverse planet carrier C26.
- Finally, fit the bush C35 to
the reverse brake drum C34
ready to tap the drum in place in the bearing C36.
Make sure all the brake drums rotate freely and then
insert the output shaft C37
turning it to engage with the splines of the planet
carrier plates.
Note. Take precautions that the running gear
assembly is kept in a vertical position and not moved
until placed in the gearbox easing, otherwise the bushes
may move out of alignment.
Brake Bands
When assembling the brake bands reverse the process of
stripping and make certain that all the guide springs D46 are in position in the centralisers D16, D17 and D18,
and that the latter are free to move on their pivots.
Final Assembly
- Fit the rear thrust bearing C36
in the gearbox casing A3 and
tap the reverse drum C34 into
place.
- Tie the pull rods D49 and D72 and hooks D26 to D31
in position with a length of wire in such a way that the
wire can he released after fitting the easing.
- Fit the bus bar D34 and after
cleaning the base plate D1
Shellac the joint, taking care to clean the Shellac from
around the hole of the ball seating D9.
- Place the 5/16'' ball D9 on
its seating, then lower the casing and ease it over the
brake bands.
- Making sure the ball valve is in place, pull the base
plate up to the casing, turn the gearbox over and gently
tap the base plate home. Fit shakeproof washers and nuts
and tighten down.
- Tighten the oil drain plug D79
and the oil well cover D5.
- Withdraw holding wire and secure the top gear hooks D30 and
D31 by means of the screw D64
and distance piece D65, etc.
- With the aid of a screwdriver, guide the lower bus bar
strut E13 into engagement
with the upper strut E12
noting that the distance piece, if fitted, is in place.
- Fit the pull rod D63 in place.
- To position the running gear, fit a tube over the output
shaft and with one operator holding the tube and another
the input shaft, guide the complete running gear through
the brake bands and into the easing. Take every
precaution to prevent the brake drums separating and
allowing the bushes to become displaced. At the same time
cheek that the pull rod D63
does not foul the running gear.
- Push the front cover B1 right
home and with the assistance of a hook, guide the
operating strut B10 into the
cup of the pull rod D63.
- Fit the top gear thrust pad assembly D51 and the table D57 and D58,
ring D59, and the nut D61.
- Assemble the details on the output shaft C37 in the reverse order to
stripping.
- Ensure that the input and output shafts are both engaged
and knock the front cover up before securing it with
washers and nuts.
- The reverse thrust pad unit D74,
which is wider than the other pads, should first he
fitted, together with its automatic adjuster table, ring
and nut. Then fit the remaining automatic adjusting parts.
- By means of a hook lower the bus bar bucket E8 on to the horns of the bus
bar D34.
- Place the lower spring guide E7
in position to engage with the bucket E5 and hold the guide vertical
by means of a tube over which slide the spring E5. Remove the tube and fit the
upper spring guide E6.
- Lay on the shims E4 and the
cap E1 and pull down evenly
by means of the three bolts E2 at the same time hold the
operating strut D53 in
engagement.
- If the locking plate A46, etc.,
have been removed from the easing they should now be
replaced.
- Clean the joint and apply Shellac, then fit the side
cover assembly A55 to A81.
- Fit the speedometer wheel A86
and the adaptor A85 if they
have been removed from the casing.
- Select and engage reverse gear and fit the adjuster
spring D62 with the two eyes
over the pin D58 on the table D78 and the loop of the spring
round the pin D60 on the ring
D59.
- Fit the adjuster springs to the remaining gears in the
same way.
- Fill the gearbox up to the correct level with the
recommended oil.
Setting and Adjusting
To obtain the correct gear setting the following adjustments
should be made, in the order set out below. The lettering of the
parts can be referred to in Figure 4.
- Slack off lock nuts "B"
and screw in automatic adjusting setscrews "C" well clear of automatic
adjusting rings "R".
- Remove all automatic adjusting springs "B".
- Select and engage reverse gear, adjust the automatic
adjusting nut "A"
until the two marks on the bus bar operating lever "AA" and bus bar operating
bush "BB" are in
line, see top figure 3. The
pedal should be allowed to return sharply when making
these adjustments to ensure there is no sticking of the
band operating mechanism.
- Carry out adjustment of 1st gear as above until the marks
on the lever and bush are in line (same position as
reverse).
- Carry out adjustment of 2nd gear as above, the mark on
the lever in this case should stop 1/8" behind the
mark on the bush.
- Carry out adjustment of 3rd gear as above, the mark in
this case being 3/32" behind the 2nd gear position.
- Carry out the adjustment of top gear as above until the
marks are in line (same position as the 2nd gear).
Note.-See Figure 3, for
lever marked positions.
Gear Automatic Adjusting Settings
- Select and engage reverse gear, screw out the automatic
adjusting setscrew "C"
until it is just clear of the automatic adjusting ring
"R" (.002")
when the ring is held as far away from the end of the
screw as possible, then tighten automatic adjusting
setscrew locknut.
- Disengage reverse gear (select and engage top gear) mark
reverse gear automatic adjusting nut, see Figure 4,. and unscrew 90º,
refit automatic adjusting spring "S".
- Select and engage reverse gear, then (operate the gear
pedal through its full movement sharply up and down. It
will be noticed while this movement is being made that
the automatic adjusting screw will turn back to its
original position. Should it travel past the original
setting the automatic adjusting screw "C" should be turned in one
complete turn and the procedure repeated. Should the nut
stop before it has reached the original position the
automatic adjusting screw should be unscrewed one
complete turn and the operation of the pedal continued
until the mark reaches its original position. The pedal
operation should he continued some twenty strokes after
the automatic adjusting nut has stopped, this is to
ensure that there is no further movement which would
throw the band out of adjustment.
- The above operation should then be carried out on 1st, 2nd,
3rd and top gears in turn.
- Should the automatic adjusting nut refuse to move when
the ring is being deflected by the automatic adjusting
screw during the pedal operation, the following points
should be checked.
- Automatic adjusting ring tight on nut
- Automatic adjusting nut tight on threads of pull
rod
- Change the spring
Note. -When making adjustments to the automatic
adjusting nut, the correct tool ST 38888 should be used to ensure
that the threads are not damaged.